Geek dude.
12 stories
·
0 followers

Hi Claude, build an MCP server on Cloudflare Workers

1 Share

In late November 2024, Anthropic announced a new way to interact with AI, called Model Context Protocol (MCP). Today, we’re excited to show you how to use MCP in combination with Cloudflare to extend the capabilities of Claude to build applications, generate images and more. You’ll learn how to build an MCP server on Cloudflare to make any service accessible through an AI assistant like Claude with just a few lines of code using Cloudflare Workers. 

A quick primer on the Model Context Protocol (MCP)

MCP is an open standard that provides a universal way for LLMs to interact with services and applications. As the introduction on the MCP website puts it,

“Think of MCP like a USB-C port for AI applications. Just as USB-C provides a standardized way to connect your devices to various peripherals and accessories, MCP provides a standardized way to connect AI models to different data sources and tools.” 

From an architectural perspective, MCP is comprised of several components:

  • MCP hosts: Programs or tools (like Claude) where AI models operate and interact with different services

  • MCP clients: Client within an AI assistant that initiates requests and communicates with MCP servers to perform tasks or access resources

  • MCP servers: Lightweight programs that each expose the capabilities of a service

  • Local data sources: Files, databases, and services on your computer that MCP servers can securely access

  • Remote services: External Internet-connected systems that MCP servers can connect to through APIs

Imagine you ask Claude to send a message in a Slack channel. Before Claude can do this, Slack must communicate which tools are available. It does this by defining tools — such as “list channels”, “post messages”, and “reply to thread” — in the MCP server. Once the MCP client knows what tools it should invoke, it can complete the task. All you have to do is tell it what you need, and it will get it done. 

Allowing AI to not just generate, but deploy applications for you

What makes MCP so powerful? As a quick example, by combining it with a platform like Cloudflare Workers, it allows Claude users to deploy a Cloudflare Worker in just one sentence, resulting in a site like this

But that’s just one example. Today, we’re excited to show you how you can build and deploy your own MCP server to allow your users to interact with your application directly from an LLM like Claude, and how you can do that just by writing a Cloudflare Worker.

Simplifying your MCP Server deployment with workers-mcp

The new workers-mcp tooling handles the translation between your code and the MCP standard, so that you don’t have to do the maintenance work to get it set up.

Once you create your Worker and install the MCP tooling, you’ll get a worker-mcp template set up for you. This boilerplate removes the overhead of configuring the MCP server yourself:

import { WorkerEntrypoint } from 'cloudflare:workers'
import { ProxyToSelf } from 'workers-mcp'
export default class MyWorker extends WorkerEntrypoint<Env> {
  /**
   * A warm, friendly greeting from your new Workers MCP server.
   * @param name {string} the name of the person we are greeting.
   * @return {string} the contents of our greeting.
   */
  sayHello(name: string) {
    return `Hello from an MCP Worker, ${name}!`
  }
  /**
   * @ignore
   **/
  async fetch(request: Request): Promise<Response> {
    return new ProxyToSelf(this).fetch(request)
  }
}

Let’s unpack what’s happening here. This provides a direct link to MCP. The ProxyToSelf logic ensures that your Worker is wired up to respond as an MCP server, without any complex routing or schema definitions. 

It also provides tool definition with JSDoc. You’ll notice that the `sayHello` method is annotated with JSDoc comments describing what it does, what arguments it takes, and what it returns. These comments aren’t just for human readers, but they’re also used to generate documentation that your AI assistant (Claude) can understand. 

Adding image generation to Claude

When you build an MCP server using Workers, adding custom functionality to an LLM is easy. Instead of setting up the server infrastructure, defining request schemas, all you have to do is write the code. Above, all we did was generate a “hello world”, but now let’s power up Claude to generate an image, using Workers AI:

import { WorkerEntrypoint } from 'cloudflare:workers'
import { ProxyToSelf } from 'workers-mcp'

export default class ClaudeImagegen extends WorkerEntrypoint<Env> {
 /**
   * Generate an image using the flux-1-schnell model.
   * @param prompt {string} A text description of the image you want to generate.
   * @param steps {number} The number of diffusion steps; higher values can improve quality but take longer.
   */
  async generateImage(prompt: string, steps: number): Promise<string> {
    const response = await this.env.AI.run('@cf/black-forest-labs/flux-1-schnell', {
      prompt,
      steps,
    });
        // Convert from base64 string
        const binaryString = atob(response.image);
        // Create byte representation
        const img = Uint8Array.from(binaryString, (m) => m.codePointAt(0)!);
        
        return new Response(img, {
          headers: {
            'Content-Type': 'image/jpeg',
          },
        });
      }
  /**
   * @ignore
   */
  async fetch(request: Request): Promise<Response> {
    return new ProxyToSelf(this).fetch(request)
  }
}

Once you update the code and redeploy the Worker, Claude will now be able to use the new image generation tool. All you have to say is: “Hey! Can you create an image of a lava lamp wall that lives in San Francisco?”

If you’re looking for some inspiration, here are a few examples of what you can build with MCP and Workers: 

  • Let Claude send follow-up emails on your behalf using Email Routing

  • Ask Claude to capture and share website previews via Browser Automation

  • Store and manage sessions, user data, or other persistent information with Durable Objects

  • Query and update data from your D1 database 

  • …or call any of your existing Workers directly!

Why use Workers for building your MCP server?

To build out an MCP server without access to Cloudflare’s tooling, you would have to: initialize an instance of the server, define your APIs by creating explicit schemas for every interaction, handle request routing, ensure that the responses are formatted correctly, write handlers for every action, configure how the server will communicate, and more… As shown above, we do all of this for you.

For reference, an implementation may look something like this:

import { Server } from "@modelcontextprotocol/sdk/server/index.js";
import { StdioServerTransport } from "@modelcontextprotocol/sdk/server/stdio.js";

const server = new Server({ name: "example-server", version: "1.0.0" }, {
  capabilities: { resources: {} }
});

server.setRequestHandler(ListResourcesRequestSchema, async () => {
  return {
    resources: [{ uri: "file:///example.txt", name: "Example Resource" }]
  };
});

server.setRequestHandler(ReadResourceRequestSchema, async (request) => {
  if (request.params.uri === "file:///example.txt") {
    return {
      contents: [{
        uri: "file:///example.txt",
        mimeType: "text/plain",
        text: "This is the content of the example resource."
      }]
    };
  }
  throw new Error("Resource not found");
});

const transport = new StdioServerTransport();
await server.connect(transport);

While this works, it requires quite a bit of code just to get started. Not only do you need to be familiar with the MCP protocol, but you need to complete a fair amount of set up work (e.g. defining schemas) for every action. Doing it through Workers removes all these barriers, allowing you to spin up an MCP server without the complexity.

We’re always looking for ways to simplify developer workflows, and we’re excited about this new standard to open up more possibilities for interacting with LLMs, and building agents.

If you’re interested in setting this up, check out this tutorial which walks you through these examples. We’re excited to see what you build. Be sure to share your MCP server creations with us on Discord, X, or Bluesky!

Read the whole story
GeekyMonkey
22 days ago
reply
Ennis, Ireland
Share this story
Delete

NVIDIA Omniverse gets DLSS 3.5, and NVIDIA celebrates Halloween

1 Share
From NVIDIA Studio-powered Halloween decorations to a community art showcase, NVIDIA Studio lets you enjoy the holiday.

Read the whole story
GeekyMonkey
447 days ago
reply
Ennis, Ireland
Share this story
Delete

Performance improvements in version 4.21 of the ArcGIS API for JavaScript

1 Share
Version 4.21 of the ArcGIS API for JavaScript contains performance improvements that will improve the draw time of polygon layers.
Read the whole story
GeekyMonkey
1213 days ago
reply
Ennis, Ireland
Share this story
Delete

Penny Pinching in the Cloud: Azure Static Web Apps are saving me money

1 Share

I've long run a few dozen websites in Azure and while I've long noticed people (frankly) wasting money by having one Azure App Service (a Web Site) per Azure App Service Plan (a VM) I tend to pack them tight.

A Basic 1 (B1) Azure App Service running Linux is around $13 a month but has nearly 2 gigs of RAM. Up that to about $26 a month and you've got 3.5 gigs of RAM and 2 Cores AND 10 gigs of storage. Use ALL that RAM. Max out that storage - use the resources you have paid for. If you hit up against a limit you can always add more and scale up. Run those boxes hot, you paid for them!

While my blog and podcast and main site run on Azure Premium SKUs (and are fast and it's worth it) I have a dozen little one pagers, brochureware sites, and toys like https://www.keysleft.com/ and I've managed them all in an App Service as well. But they are static sites. They are nothing sites...so why do I need an App Service? It's overkill.

Turns out Azure Static Web Apps are a lovely thing and they are FREE while in Preview. It's great for static sites, sites made with static site generators, or Jamstack sites with serverless functions behind them.

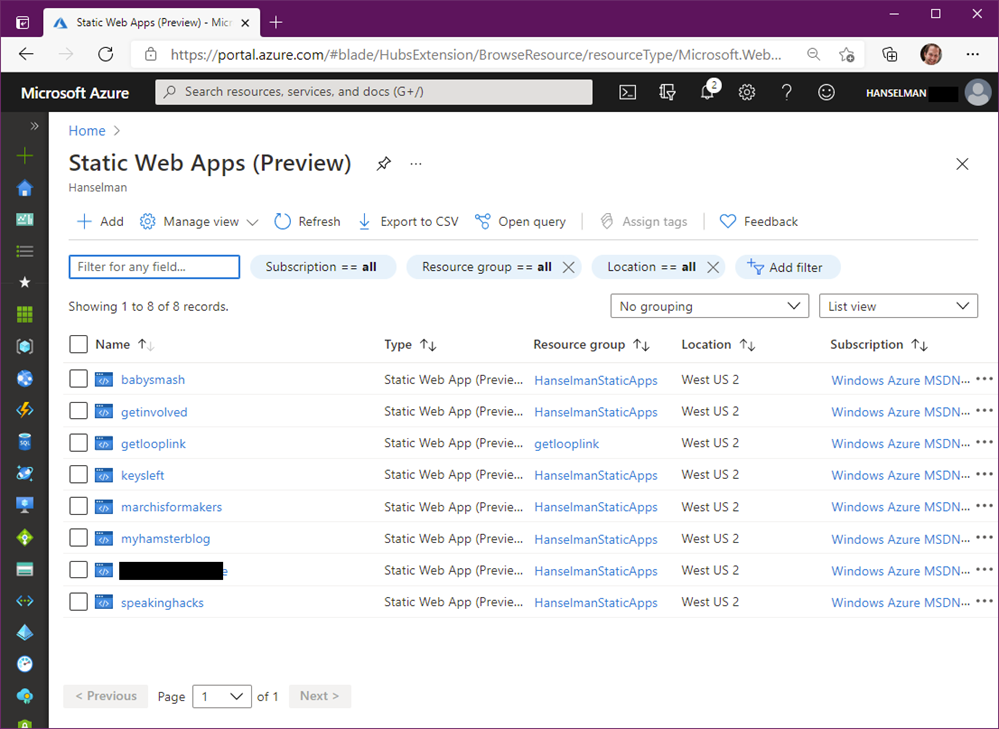
So I converted a bunch of my little sites to Azure Static Web Apps. Took maybe 90 minutes to do 8 of them as seen below.

Azure Static Web Apps

Since the code for these sites was already in GitHub, it was very easy to move them.

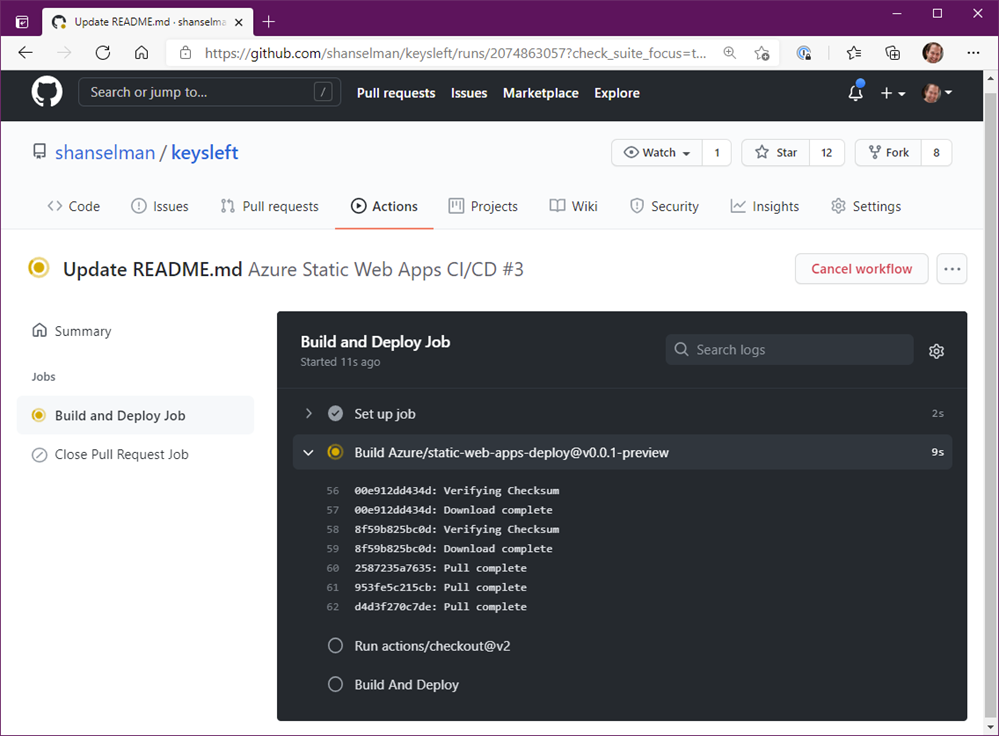
For example, the code for the KeysLeft site is at https://github.com/shanselman/keysleft and Azure Static Web Apps has a GitHub Action that easily deploys it on every commit. It's butter. It's created for you but you can see the generated GitHub Action as it lives alongside your code.

Azure Static Web App Static Site

The docs are clear and it works nicely with Vue, React, Angular, or just regular HTML like my son's Hamster Blog. https://www.myhamsterblog.com/

As it's in Preview now it's free, and I'm sure it'll be super cheap when it goes live. I have no idea how much it will cost but I'll worry about that later. For now it's allowed me to turn off an entire Azure App Service and replace it with Azure Static Web Apps.

They also support custom domains and they automatically make and assign you an SSL cert. My only complaint is that there's no easy support (today) for apex domains (so all mine have www. as CNAMES) but you could proxy it through a free Cloud Flare account if you really want.

Check it out, I suspect you have a site right now that's either generated or just static and this could save you some money.


Sponsor: Protect your apps from reverse engineering and tampering with PreEmptive, the makers of Dotfuscator. Dotfuscator has been in-the-box with Microsoft Visual Studio since 2003. Visit preemptive.com/hanselminutes for a professional-grade trial.


© 2021 Scott Hanselman. All rights reserved.
    
Read the whole story
GeekyMonkey
1403 days ago
reply
Ennis, Ireland
Share this story
Delete

Core Loop in Game Development

1 Comment

What exactly is it?

A core loop is one of the most important parts of game design, especially in F2P production.

It is what people think of when you ask them about the game. It might be one level in Candy Crush Saga, one session of Clash of Clans, one mission in Battlefield or a single deathmatch in Team Fortress 2. The core loop is the basic thing that the player does over and over again. The proper reaction when you show it to someone is “Ok, nice, now I understand your game.”

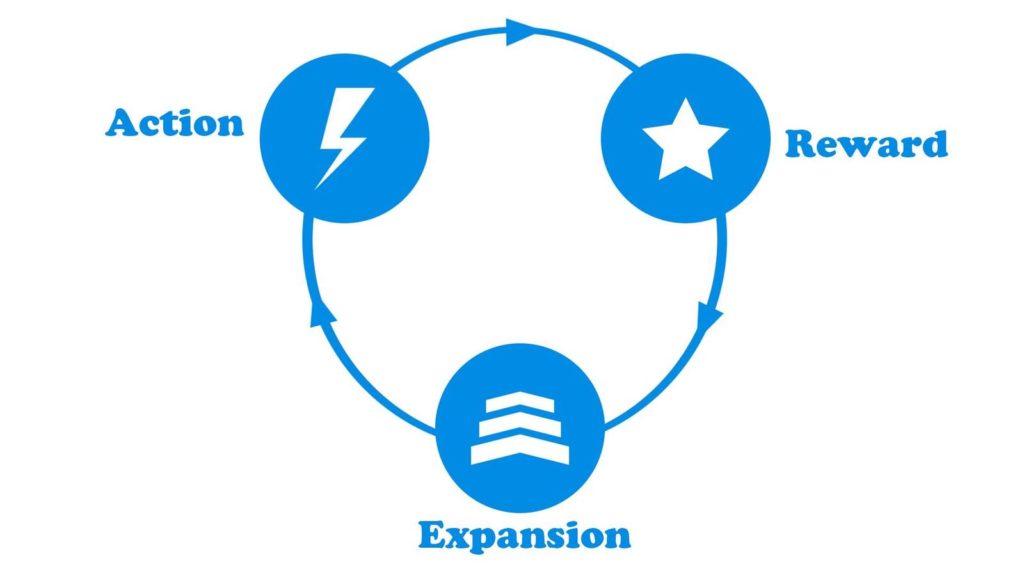
The thing is, though, they don’t. They only understand the core of the game, but there is much more to it than just that. While this may sound simple, many developers have failed because they couldn’t figure this out or just didn’t want to waste time on this. The core loop should explain the main goal of the game. It is usually presented graphically, with a description above or below. Sometimes a loop will be so perfect that players keep coming back to the game a few times a day. In F2P development this is a particularly important matter because it improves retention, which is one of the most significant things in monetization. The basic core loop should show, in a simple manner, the main actions that users have to do in order to gain rewards and expand their characters.

Source: Dejan Zuza, Improve your game: Core loop 

Why is it so important?

Here we have to ask ourselves: 

Can we build a game without a core loop? Probably.
But can we build an excellent game, with a great economy, that will turn into a great product and achieve sales success? Probably not.

As mentioned earlier, the core loop is one of the most important parts of game production. It is the skeleton on which all the mechanics, logic, and economy of the game are built. As is easy to guess, without a skeleton it would be hard to keep the whole body from falling apart. Some game designers argue that the best core loops are based on real-world activities. There is truth to that. A Core Loop helps to determine what the game is about and define and clearly explain its mechanics 

In fact, if we can’t make a core loop, it means that we don’t know what our game is about.

Core Loop Types

There are several types of core loops. Mostly, which type we choose depends on how detailed we want the description of the game to be and how we look at it. The truth is, we can’t define the whole game with one loop; it is simply not possible. For this purpose, the game loop categories have been created.

We distinguish 4 types of game loops.


1. Main Loop

Main Loop is a general description of the game. It mainly shows us the direction of the game and what the player will be dealing with. Loop should be constructed that the regular player can tell what he will do in the game, without spreading mechanics down. The person after reading the main loop should know what are the basic resources of the game, on what rules game is based, what can be done to achieve the goal of the game and what will prevent it. That’s it. Very often we use this type of loop for pitching our game.

Source: Mobile Free to Play: The Free to Play Game Design Bible: Crafting a Strong Core Loop

Brawl Stars – Core Loop Deconstruction

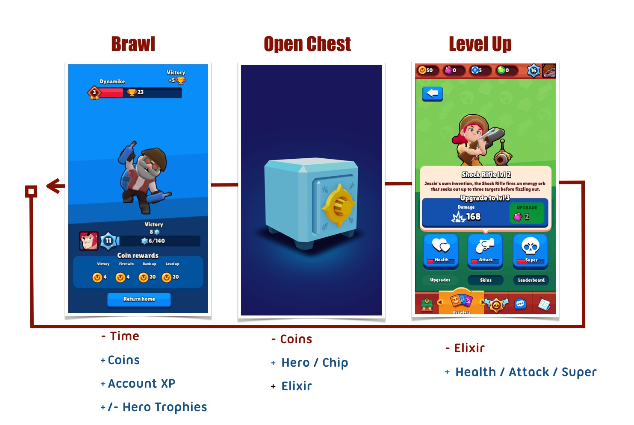
In this example, we will deconstruct the Brawl Stars. The game shows us how the basic, general game goes. First, we enter the game, we fight with other players, which is why we lose our time, but we gain “Coins”, “Account Experience” and we have the opportunity to gain or lose “Hero Trophies”. The next step is to improve our character and items. At this stage, we can see that we are losing “Elixir” but we are increasing the maximum value of the “Health” and “Attack” resource. The next step is to open a loot box. We’re losing coins, but we get new “Heroes” and “Elixir”, which we previously spent on improving “Heroes”. And we return to the starting point. As you can see, in a few pictures you can describe the whole game flow without going into detail.


 2. Dual Loop

A dual loop allows players to either stop their session after the first loop or continue playing through both of the loops, extending their session. This loop is used very often for games that consist of farming resources expanding a given instance; mostly strategic games. The dual loop is not a subcategory of other game loops; it is considered to be one of the core loops. Depending on the type of game, either the dual loop or the main loop is used as the source of the game’s description.

Source: Kevin Wolstenholme, What is a Core Loop in a Mobile Game?  

Clash of Clans: Core Loop Deconstruction
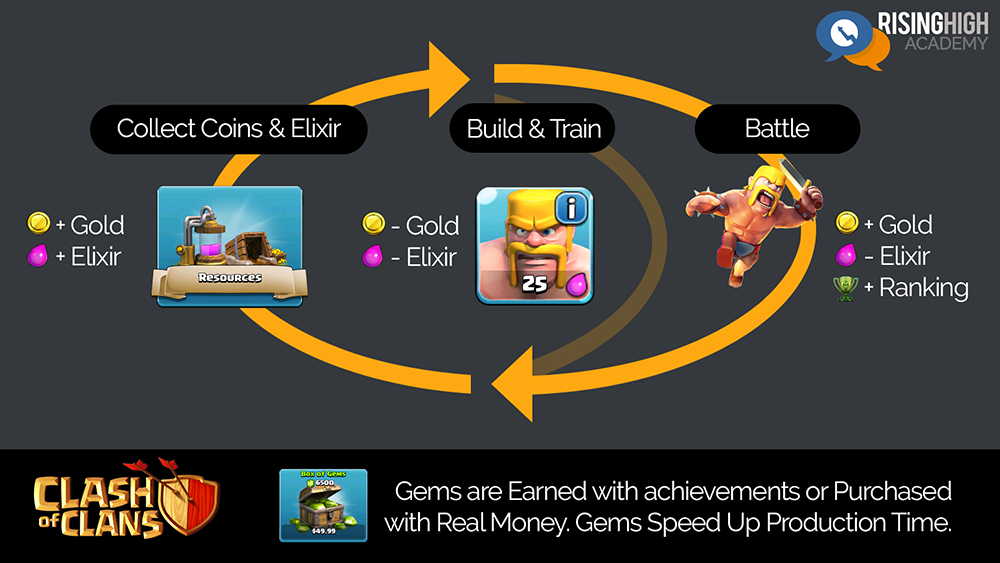
In this case, we will deconstruct one of the most recognizable mobile games: Clash of Clans. At the beginning we can see the acquisition of resources: We acquire “Gold” and “Elixir” by producing it in real-time in our factories. Then we either go to fight or we build and level up our character (in this case: the City). If we fight with the NPC, we gain “Gold” and “Ranking Points”, but we lose “Elixir”. However, instead of immediately fighting, we can first train our military units and improve our city equipment. As a result, we get rid of the resources “Gold” and “Elixir”. Then, going back to the beginning, we can either collect resources and spend them on improving ourselves, or go to fight again. Thus we have described a game that never ends. This is a very general overview; as inside this loop, there is another dozen, or several dozens of loops that create game content.


3. Nested Loop

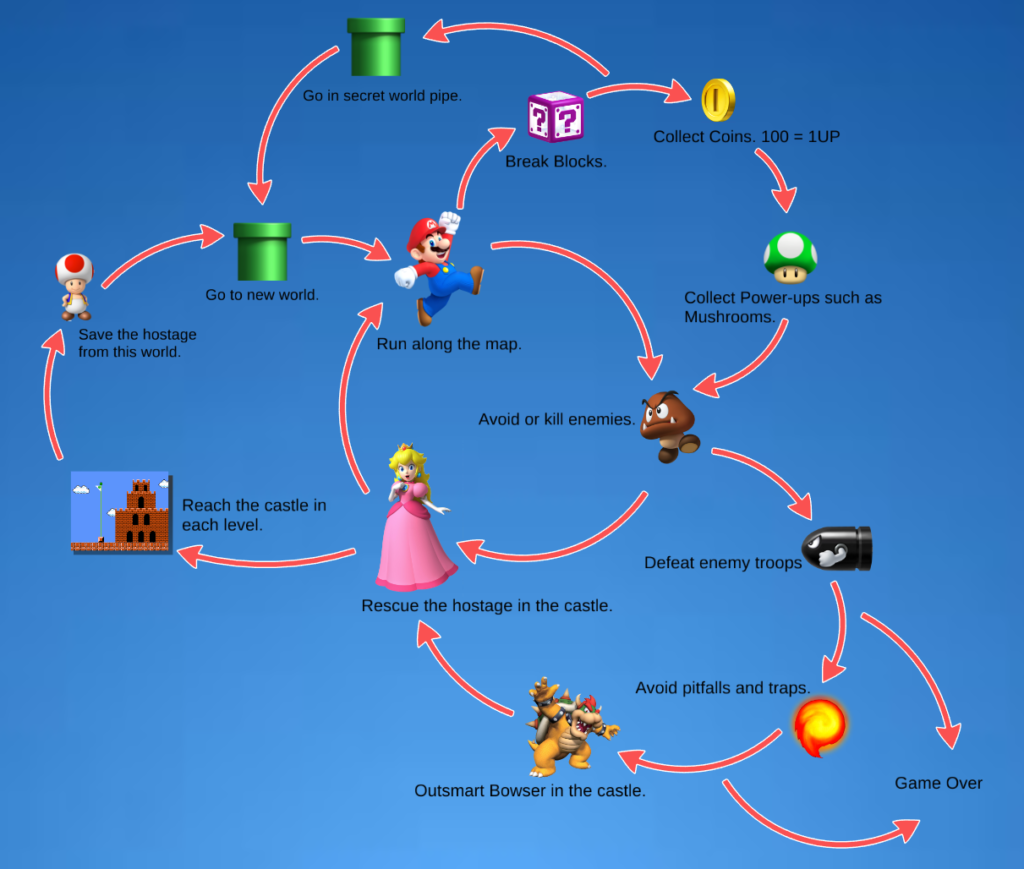
Nested loop is a programming term which refers to putting a loop inside another loop. In this case, it almost looks like a well-made loop. The distinguishing factor is that loops have set finish points before they begin and the player doesn’t have to finish one loop before starting another. For example, the player can jump on a brick and at the same time use a spell or a simple attack. In preparing a nested loop we should describe each of the tiniest elements of the game, including how the input/output works, player movement and behavior. A programmer looking at it should be able to understand the logic of the game and immediately start working on the project. This loop should contain several loops inside. Game designers usually implement a game loop into a nested loop, creating a loop that shows the whole game step by step.

Source: Ethan Stanaway, Super Mario Bros: Core Game Loops and Reward Structures

Mario: Core Loop Deconstruction

In this case, the Mario loop shows us the player’s goal and journey, as well as the system’s response to the player’s behavior. However, it lacks accuracy, and there’s no breakdown into smaller elements and no description of the game’s economy.


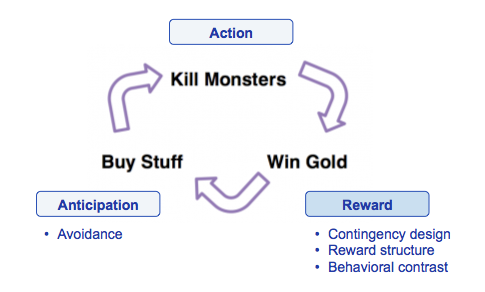
4. Compulsion Loop

“A habitual, designed chain of activities that will be repeated to gain a neurochemical reward: a feeling of pleasure and/or a relief from pain.” – Joseph Kim, Gamasutra.com

Source: Mobile Free to Play: The Free to Play Game Design Bible: Crafting a Strong Core Loop

In this kind of loop, we focus on the psychological aspect of playing games. The mechanics are described in terms of a player’s mind. The purpose of the loop is to create a constantly repeated habit, such as  looting your enemies. This loop should include a set of specifically designed activities within each step in the chain. In this case, the loop shows us how we can get the player addicted to the game with carefully planned mechanics: using the psychological desire to amass and improve your equipment, we lead the player into the compulsion loop. Our only goal now is to make sure that the player stays in it as long as possible, which means we now have to think about the next set mechanics and psychological tricks.


How can you achieve a good core loop?

Game designers often ask themselves how to make a good loop. Here is an exercise: try to pretend to be an investor, a programmer, and a grandmother. This will reveal the different perspectives. Each of these characters has an important role to play, I promise. The investor should understand the game but most importantly notice its sales potential. The programmer should know what the game is about, but mainly understand the logic of the game and how to build it. And the grandmother? Grandma has to demonstrate that the game’s mechanics are based on real-world activities, as she will be trying to find out exactly what is going on in the game, and she will keep asking her grandson (You!) to explain it to her. 

A more serious answer to this question, however, is to first plan your game, and then break it down to its basic parts, so that you are forced to analyse every possible aspect of the game. It always starts the same way: at the beginning, we don’t really know what to write. We have this idea for a game, but we can’t really summarize it well. So we start to write or draw or visualize in some other way what we have in our heads. We get to the point where we think we have written the game. But this is a very false and misleading impression! At this stage we must remember that practically no game can be described in several pages.

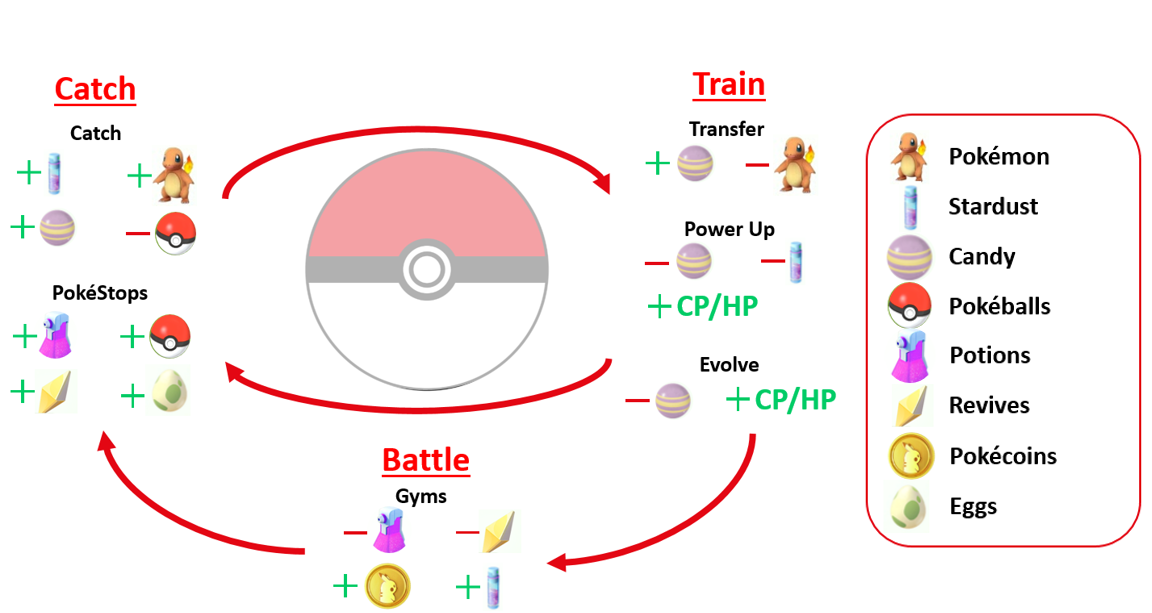
Then we start from the beginning. This is called iteration. We come to the point where we have already written the mechanics, e.g. what the player’s movement should look like, lthough we can very rarely describe it in detail without iterating. We usually get to a point where we have already done this, and then we start from the beginning, but now we have in mind more details about our game , more thought-out options and game mechanics, and above all, the skeleton of our mechanics. And so we encapsulate the skeleton until the whole body is created.


Source: John Haag, Pokémon Go: A Teardown

In my opinion, a well-made loop is when you read it and ask yourself this question: … Right. There should be no questions.

A perfectly done economy core loop contains:

  • main goal
  • minor goal
  • basic mechanics
  • basic game economy

Psychological aspect

The core loop is not only about numbers, mechanics and logic. It is also about how to keep the player for longer, how to make the player think every minute of the game how in 2 hours he will be telling his friends what a great game he played. How do you do it so that the player can feel the satisfaction of the game all the time? The psychological aspect is here to help.

Scientists say that the player’s expectations and desires are programmable.

Showing them from the very beginning what is most important and what is less important programmes the player’s mind. From now on, when the player sees diamonds instead of the usual silver coin, dopamine in the brain will start coursing through their body. They feel excited and a smile appears on their face. The right amount can even lead to sounds being produced.

Influencing the player’s psychology is an incredibly important aspect of building the flow of the game. These are the so-called instant reward mechanics.

The player will not be aware of what is happening in his brain, but the whole game is programming his mind every second. Even rest can constitute a reward. If we have energy resources in the game, through which the player can run, we can renew the whole energy bar by walking slower for some time. There are hundreds of such hidden mechanisms.

When planning the psychological aspect of the game, remember to not stifle your creativity in creating the mechanics. The sky’s the limit.


Not only for games

Last but not least! Core loops can be used not only in games, but in apps too. These loops can even describe our lives. Such a loop is just a tool for writing down the logic of anything. For example, the human life loop would look like this: we are born, we grow up, we learn and study, then we go to work, then we learn and study again, then we change jobs all the time, until we finally leave this loop, which is what we call death. Our whole world is one big loop.

A perfect example would also be Starbucks.

We can see here what the path looks like in this popular coffeehouse. 

First we buy coffee, but we also get points and discounts for the next coffee, which contributes to our purchase of another coffee, and this is how our coffee adventure becomes a loop.

Source: Robbie Allen, Core Loop: The Must Have Feature for Every Mobile App

Of course, let’s not go from one extreme to another. Coffee can defend itself and we do not owe everything to these psychological tricks. And so must we do in games. Sometimes a very good game can defend itself, but sooner or later the developers will have to improve it anyway and without logical deconstruction – there is no such possibility.

Depending on how the application is constructed, loops can be simple or more complicated.


Summary

Core Loop is one of the most important things in game development.

If you’ve never done it, it’s time to start creating core loops and make your and your team’s lives easier.


Thanks for your time!

The post Core Loop in Game Development appeared first on The Knights of Unity.

Read the whole story
GeekyMonkey
1723 days ago
reply
Game design insights
Ennis, Ireland
Share this story
Delete

Microsoft Authenticator gets backup and sync on Android

1 Share

Swapping to a new device just got a bit easier for Microsoft Authenticator users.

What you need to know

  • Microsoft Authenticator gained a backup and recovery feature.
  • The feature makes it easier for users who switch to a new device.
  • Microsoft Authenticator allows users to use two-factor authentification using their phone.

Microsoft Authenticator now supports backup and recovery to ease the hassle of switching to a new device. You can backup and restore all of your accounts when you switch to a new device, saving the time it would require to set accounts up again. Microsoft Authenticator supports Microsoft accounts as well as Amazon, Dropbox, Google, and Facebook, so some users will have a large collection of saved accounts.

Microsoft Authenticator is a two-factor authentification app that allows you to confirm logins using your phone. After setting up an account, notifications will be sent to your phone to verify logins. You then use a fingerprint, face ID, or PIN to verify your identity. The app also works with multi-factor authentification. The full description of the feature is on the app's store listing:

Backup and recovery feature is now available! Now, when you move to a new device, your Microsoft Authenticator app will keep your accounts, to help you avoid getting locked out or having to set up again.

Two-factor authentification is required in many situations and is recommended even when not required. It adds a second layer of security and can help prevent hacks and security issues.

Microsoft Authenticator

Free at Google Play

This app makes it easy to set up two-factor authentification that works with a fingerprint, face ID, or PIN.

Read the whole story
GeekyMonkey
1956 days ago
reply
Ennis, Ireland
Share this story
Delete
Next Page of Stories